This function enables the management of the FX transactions of two currencies at a negotiated date (value date) and rate (forward exchange rate), and the setup of the exchange risk hedging.
Forward Exchange Transactions can be settled, carried forward or early exercised.
Once the FX transaction is created and saved, you can associate it with the corresponding commercial forecasts.
This function enables you to view or modify the forward legs of the swap transactions.
- Until the back-office validation of the swap transaction, the only thing you can do through this function is to view the forward legs; to modify a leg, you need to use the management function of Swap Transactions.
- If the transaction was back-office validated, you can modify the forward legs through this function.
Info
The settled and back-office validated transactions can neither be modified, nor deleted.
- In the Modules Tasks pane, select the Forward Exchange option in the Management folder of the FX module.
The modification page of the default filter for this function, is displayed.
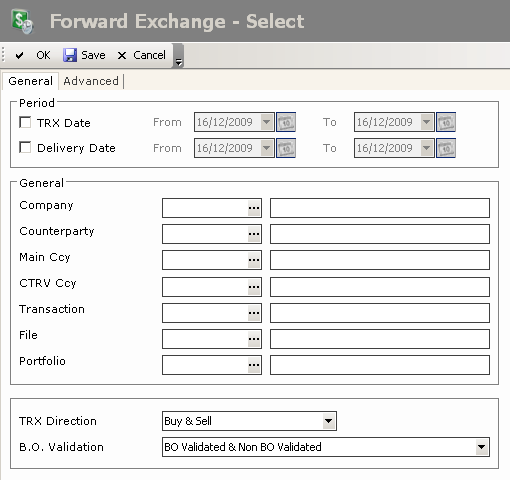
This page enables you to define filtering criteria restricting or enlarging the selection of transactions to display in the transactions page. If no filter is defined here, all the existing transactions are displayed on the page. If the number of transactions is too large, restricting the selection improves the legibility.
Info
For the description of this page's fields, see the topic below explaining filters creation.
- Set up the filter, then click OK.
The management page for Forward Exchange Transactions is displayed with the list of the created transactions in a table.
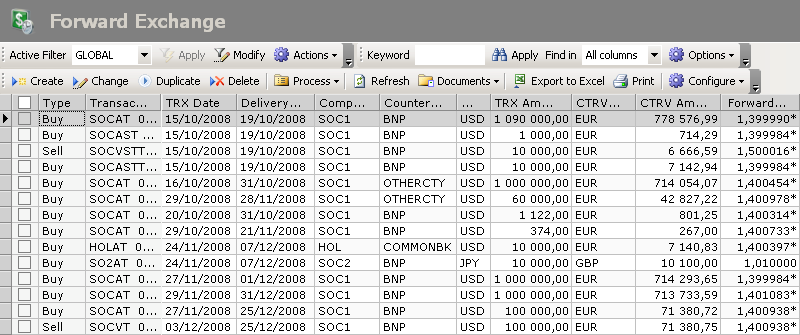
This table presents the list of the forward exchange transactions with, to name a few, the type, number and amount of the transaction, the countervalue, the transaction and delivery dates, the company, the counterparty and the forward exchange rate.
For more information on:
- reorganizing the lines in the table, click here
- how to search text in the table, click here
- creating and duplicating transactions, see the topic below,
- modifying transactions, click here,
- deleting transactions, click here,
- commercial forecasts links, see topic Commercial Forecasts Link,
- back office validation of transactions, see topic Back-office Processing,
- settlement, carry forward or early exercise, see topic FX Transactions Follow-up,
- editing transaction-related documents, see topic Transaction-related Documents,
- displaying the cash flows linked to a transaction in the Cash Ledger, see topic Cash Ledger.
You can change the layout of the table: selecting columns, filtering displayed information, grouping lines according to data, etc. For more information on this feature, see topic Table Reorganization.
- In the setup page for Forward Exchange Transactions, click the Create button.
The creation page is displayed.
The header presents the basic information of the transaction.
- Complete the fields of the header.
In the following table, the green ticks in the M column indicate that the fields are mandatory.
The red crosses in the E column indicate the fields that cannot be modified once the transaction is saved.


The Characteristics tab enables you to define the main information on the transaction to create.
- Complete the fields of the tab.
In the following table, the green ticks in the M column indicate that the fields are mandatory.
The red crosses in the E column indicate the fields that cannot be modified once the transaction is saved.
In the Rate area, the values can be manually entered or automatically completed, depending on the entry option selected in the CTRV Modes list:
- If you selected Enter Rate or Enter Rate and Exchange Value, the swap points and the forward exchange rate are completed on the basis of the rates set up in the Market Data module. For more information on the currencies setup, see Market Data documentation.
You may modify one of the entered values if needed. The other values would then be automatically recalculated: if you modify the swap points, the forward exchange rate is recalculated; if you modify the spot exchange rate or the forward exchange rate, the swap points are recalculated.
- If you selected the Enter Exchange Value option, the values are calculated on the basis of the amount in the main currency and of the amount in the countervalue currency.
Click the button  to change the direction of the rate expression for the values of the Rate area (spot exchange rate, swap points, forward exchange rate). The displayed values correspond to the direction of countervalue currency against main currency, but the direction of the transaction does not change.
Click again the button to redisplay the values with the direction of the transaction.
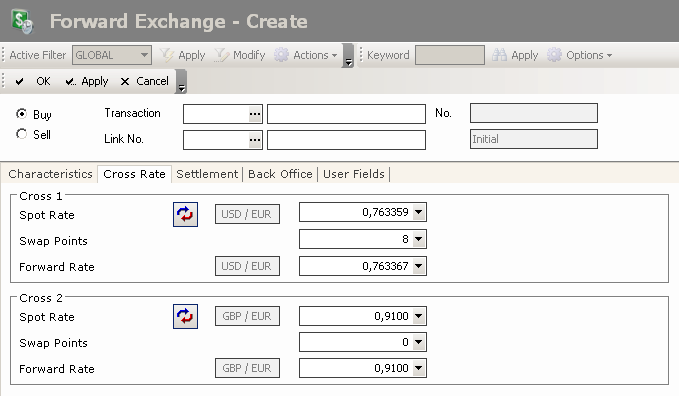
This tab enables you to define the different cross forward rates, when none of the currencies of the FX transaction corresponds to the local currency of the company. It includes the rates for two currencies according to the local currency of the company and to the transaction date.
Your company uses the euro as its local currency and you are concluding a transaction in dollars against pounds sterling.
- The dollar/pound rate (or the reverse) is specified in the Characteristics tab.
- The dollar/euro and euro/pound (or the reverse) are specified in the Cross rate tab.
These rates against the local currency are used to calculate amounts in the local currency, for instance. These calculations are required for the positions or the results: average rate, revaluation, breakeven point, results, etc.
These rates are calculated on the basis of three elements:
- the exchange rates from the Characteristics tab,
- the exchange rates set up in Market Data.
- the interest rates set up in Market Data.
The calculation methods for the cross rates are the same as the ones for the spot exchange.
The following table describes the fields of this tab. The two areas of the tab (Cross 1 and Cross 2) enable you to enter information on the FX rate of one currency of the transaction compared with the local currency of the company. The fields of this tab are identical in both areas.
- To modify the values in this tab, enter values where needed, or calculate them using the calculator. For more information on how to use the calculator, click here.
- Place your cursor in another field. The other values are automatically updated:
- if you modify the swap points, the forward exchange rate is recalculated,
- if you modify the spot exchange rate or the forward exchange rate, the swap points are recalculated.
- Click the button if you want to change the direction of the quotation, as described previously.
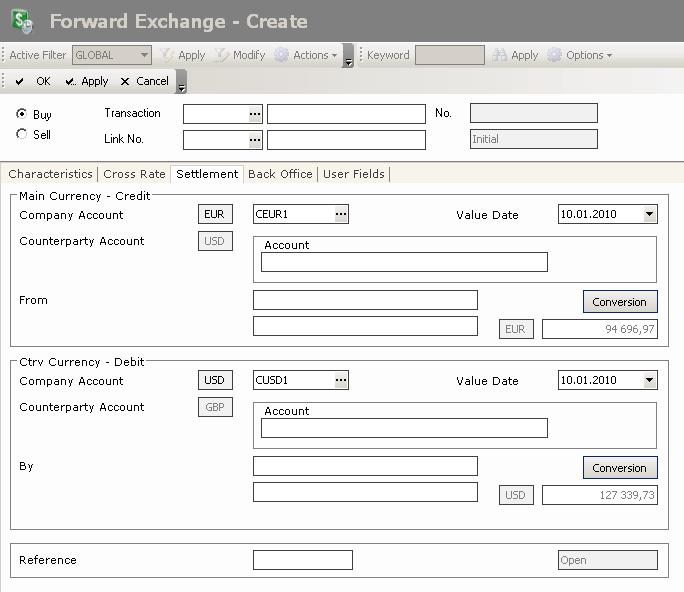
This tab enables you to specify information on the payment instructions: bank details required for the funds transfers and delivery dates.
Info
This tab does not enable the settlement of the transaction, but does enable the specification of information about it. For more information on the Settlement, see topic Settlement.
You do not need to enter the bank details when creating the transaction. This is something that you can define in the module setup. For more information, refer to topic FX Configuration. This element becomes crucial only when the transaction is settled.
This tab is identical to the Settlement tab of the creation page for Spot Exchange Transactions, apart from the presence of an additional field (described below) dedicated to the transaction status.
- The Main Currency area enables the selection of the accounts for the main currency that will be credited for a buy or debited for a sell.
- The Ctrv Currency area enables the selection of the accounts for the countervalue currency that will be credited for a sell or debited for a buy.
In the following table, the green ticks in the M column indicate that the fields are mandatory.
After its creation, the contract remains open until its settlement. Once it is settled, you cannot modify it anymore, but you can view it. It also disappears from the financial position to be integrated into the stock, then into the balance.
- Click on the Back Office tab.
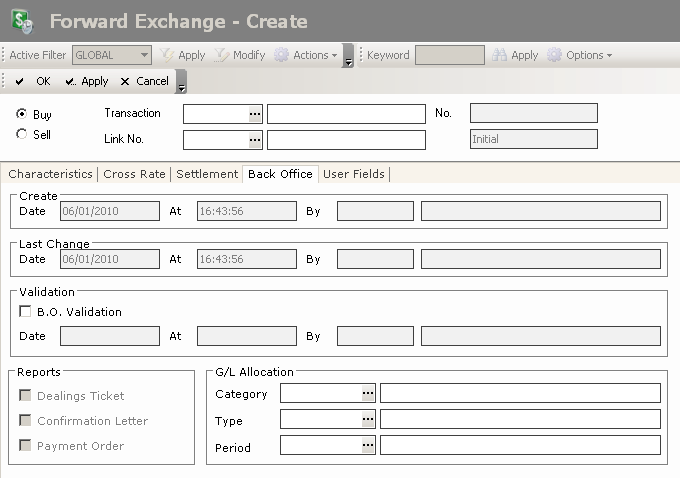
This tab displays the information reserved for administration use and transaction security, required for the international treasury management. It also lists the transaction events: creation, last modification, back-office validation, generated reports.
From this tab, you can process the back-office validation of a transaction.
This tab is the same as the Back Office tab of the creation page for Spot Exchange Transactions.
In the following table, the green ticks in the E column indicate that the fields are editable.
- Click on the User Fields tab.
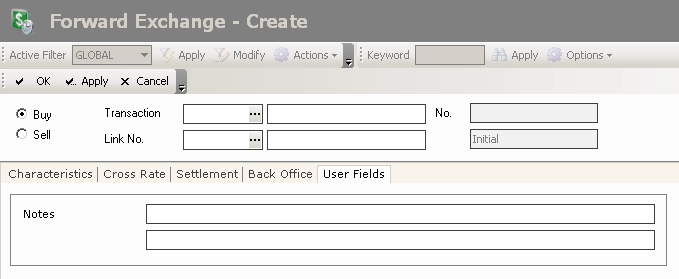
This tab enables you to define additional information on the transaction in a small text.
- In the first field, enter the notes that you want to include in the ledger.
- In the second one, enter the notes that you want to include in the dealing ticket.
- Click OK to validate the creation or Cancel to cancel it.
Two flows are generated in the Treasury: a receipt flow in the main currency and a disbursement flow in the countervalue currency.
The procedure for the duplication of Forward Exchange Transactions is virtually identical to the procedure for the duplication of Spot Exchange Transactions. Click here for more information.
However there is a difference. In the duplication page of the transaction, if you enable the option Initial characteristics with updated dates and rates, four dates are automatically completed.
- The transaction is set to today's date.
- The spot value date and the maturity date are set to today's date plus two worked days depending on the broker calendar.
- The delivery date is set to the maturity date plus two worked days.
Info
You cannot duplicate the leg of a swap since it is not an individual transaction.
To access the creation page for filters from the management page of Forward Exchange Transactions, click the Actions dropdown menu in the filters toolbar, and select the Add option.
The creation page for filters is displayed.
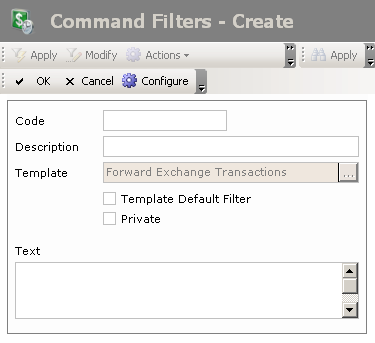
This page enables the definition of unique identification information for the filter.
- Enter a code and a description for the filter in the Code and Description fields.
- If you want this filter to be applied by default when you access the management page of Forward Exchange Transactions, enable the Template Default Filter option.
- If you want this filter to be only accessible by yourself, select the Private option.
- You may add a comment in the Text area.
- Click the Configure button to set up the filter settings.
The configuration page for filter settings is displayed.
If you want to copy the settings of an existing filter, click the Copy From button in the action bar. Click here for more information.
The filter settings are all optional: complete the ones for which you want to apply filtering criteria.
The General tab enables you to specify a filtering process on different elements: transaction date, delivery date, company, counterparty, currencies, transaction type, file number, portfolio number, transaction direction, back-office validation.
- In the Period area, if you want to specify a filtering process on the transaction date, go through the following process.
- Enable the TRX Date option.
Info
Disable this option if you want to disable the filtering process on the transaction date.
The From and To fields of the area are enabled.
- In these fields, specify the start and end dates of the period in which must fall the transaction date of the transactions to display, by going through the following process:
- In the entry field, select the value to modify and enter a date with the format dd.mm.yyyy.
- or -
- Click the
 button to display the calendar.
A contextual window displays the calendar.
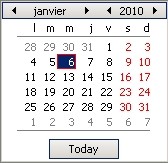
Use the arrows  and
and  to select the month, year and day.
- or -
To set the start date to today's date, click the button Today.
- To specify a filtering process on the delivery date, enable the Delivery Date option, then go through the same process as above, to define the start and end dates of the period in which must fall the delivery date for the transactions to display.
Info
Disable this option if you want to disable the filtering process on the delivery date.
- In the General area, to filter on one of the following elements, use the button
 as explained previously:
| Field | Description |
|---|---|
| Company | Applicant (Company) |
| Counterparty | Counterparty with which the transaction is concluded |
| CCY Main | Main currency of the transaction |
| CCY CTRV | Countervalue currency of the transaction |
| Transaction | Transaction Type |
| Folder | Number of the file in which the transaction is included |
| Portfolio | Number of the portfolio in which the transaction is included |
- In the Buy/Sell dropdown list, select a filtering criterion on the direction of the transaction:
- Buy to select the buy transactions only,
- Sell to select the sell transactions only,
- Buy & Sell to disable any filtering process on the transaction direction.
- In the BO Validation dropdown list, select one filtering criterion on the back-office validation of the transactions:
- Non B.O. Validated to select the non back-office validated transactions only,
- B.O. Validated to select the BO-validated transactions only,
- B.O. Validated and Non B.O. Validated to disable any filtering process on the back-office validation.
- Click on the Advanced tab.
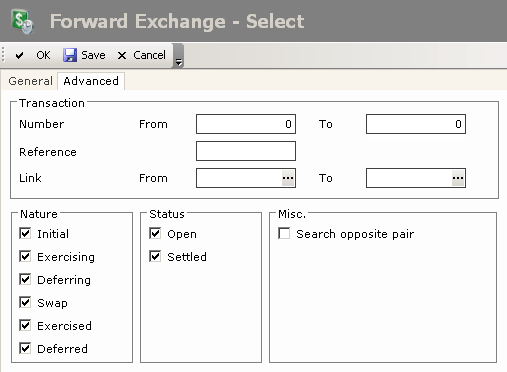
This tab enables you to define the filtering criteria on commercial transaction numbers, reference numbers, link numbers, statuses and the transactions using the opposite currency pair.
- In the Number field of the Transaction area, enter a range of order numbers for the transaction.
Important
They are not the complete numbers of the transaction, but the numbers of the creation order, they can be found on the right of the transactions numbers. The transaction number consists of the company code, the transaction type code and the transaction order number.
- In the Reference field, enter the external reference number for the transaction.
- In the Link No field, enter a range of link numbers for the transactions.
- In the Nature area, enable the options corresponding to the transaction statuses that you want to view:
- Initial to select only the initial transactions (manual creations),
- Exercising to select the transactions created after the early exercise only,
- Deferring to select the transactions created after a deferment only,
- Swap to select the transactions that are legs of swap transactions only,
- Exercized to select the transactions that were subject to an early end only,
- Deferred to select the transactions that were subject to a deferment only.
Info
For more information on transaction types, see topic FX Transaction Types.
- In the Status area, select the option:
- Opened to select the non-settled transactions only,
- Closed to select the settled transactions only.
- In the Misc. area, select the Search Opposite Pair option, if you want to select the transactions with the opposite currency pair too.
If you selected the EUR/USD pair (euro as the main currency and dollar as the secondary currency) in the General tab, this tab enables you to select the transactions with the USD/EUR direction too.
- Click the following buttons, as needed:
- OK to validate the setup and go back to the management page for Forward Exchange Transactions,
- Cancel to go back to the management page for Forward Exchange Transactions without saving this setup.
For more information on the application, modification and deletion of filters, see topic Filters.