This report enables you to view the details of Forward, Spot and Swap Exchange Transactions stored in the FX module.
- From the Modules Tasks pane, select the Exchange Ledger option in the Report folder of the FX module.
- If no filter has been set up for this report, the creation page for filters is displayed. You first need to create a filter.
This filter enables you to select the FX transactions to display according to your criteria.
See the topic below for more information on the creation of selection filters for FX Transactions.
- If a filter has already been set up, the modification page for filters appears with the default filter settings.
If you need to modify the filter settings, see below the topic regarding filters creation.
- Click OK to view the report with the filter settings.
![]()
The header displays the report name, as well as the filtering criteria defined in the report filter (see the topic below for more information on this type of filter).
The body of the report presents a table with the details of FX Transactions.
- To access the filters creation page from the report page of the Exchange Ledger, click the Actions dropdown menu in the filters toolbar, and select the Add option.
The creation page for filters is displayed.
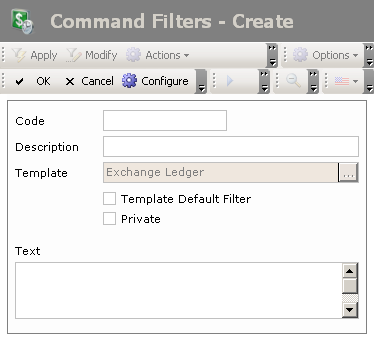
This page enables the definition of unique identification information for the filter.
- Enter a code and a description for the filter in the Code and Description fields.
- If you want this filter to be applied by default when you access the report page, enable the Template Default Filter option.
- If you want this filter to be only accessible by yourself, select the Private option.
- You may add a comment in the Text area.
- Click the Configure button to set up the filter settings.
The configuration page for filter settings is displayed.
If you want to copy the settings of an existing filter, click the Copy From button in the action bar. Click here for more information.
Info
If you do not specify any filtering criterion for the transactions in the different tabs of this page, the report will include all the existing FX transactions.
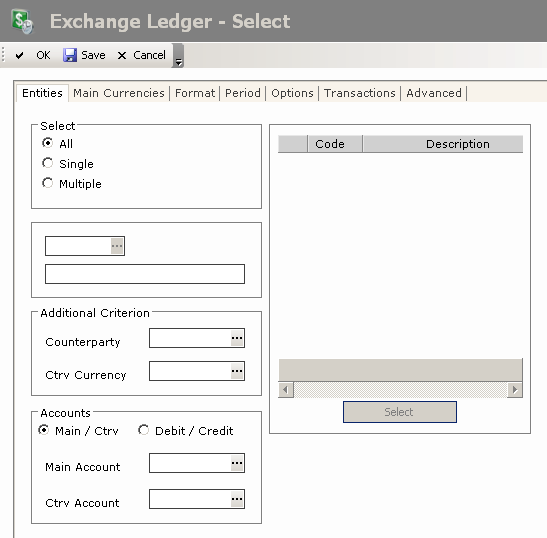
The Entities tab enables you to specify a filtering on the applicant companies of the FX transactions to include in the report, as well as a filtering on the counterparty, the countervalue currency and the bank accounts associated with the main and countervalue currencies of the transactions.
- In the Select area, enable the following option:
- All not to apply any filter on the companies,
- Single to select a single applicant company (selection in the area below),
- Multiple to select several applicant companies (selection in the area on the right).
- In the Select area , if you selected the following option:
- Single, select a company by clicking the button
 in the area below, then, in the contextual window, double-click your company;
 - Multiple, select several companies as described below.
- On the right of the Select area, click the Select button.
- In the contextual window, enable the options in front of the codes for the companies to select, and click the
 button at the top of the window.
The codes and descriptions for the selected companies are displayed in the table of the area.
- In the Additional Criteria area, you can add other filtering criteria on the countervalue currency of the transactions, using the button.
- In the Accounts, you can define the criteria for the filtering on bank accounts as explained below.
- If you want to define a filtering on the accounts according to the main and countervalue currencies:
- Enable the Main / Ctrv option.
The Main Account and CTRV Account fields appear in the area.
- In these fields, select one bank account for the main currency and another one for the countervalue currency, using the button.
- If you want to define a filtering on the accounts according to the flow direction:
- Enable the Debit / Credit option:
The Debit Account and Credit Account fields appear in the area.
- In these fields, select one bank account for debit flow and another one for credit flow, using the button.
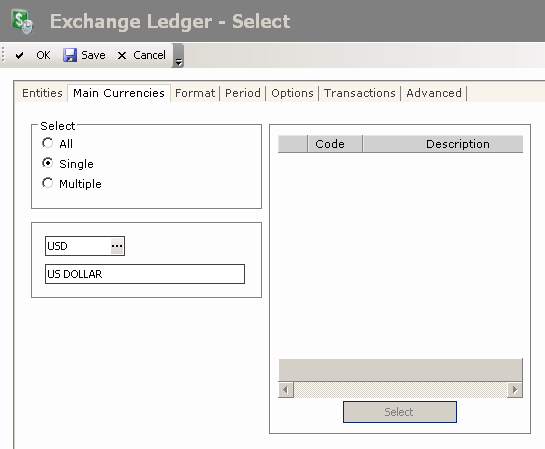
This tab enables you to specify filtering criteria on the main currencies of the FX transactions to include in the report.
- In the Select area, enable the following option:
- All not to apply any filter on the main currencies,
- Single, to include only the FX transactions which use the selected currency as main currency (in the area below),
- Multiple to include the FX transactions which use one of the selected currencies as main currency (in the area on the right).
- Go through the same process as in the Entities tab, to select one or several main currencies.
- Click the Format tab.
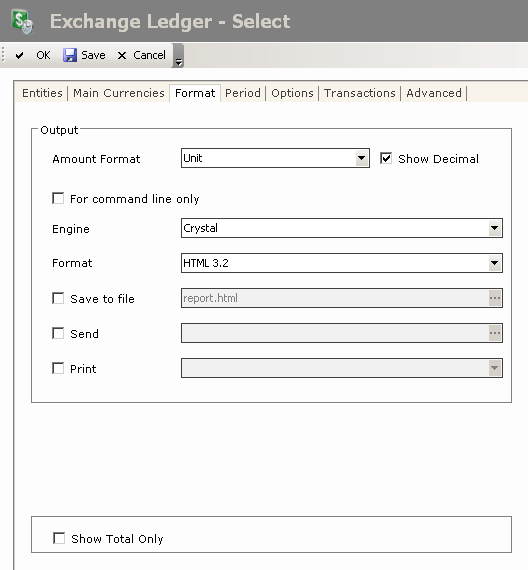
This tab enables you to specify the output formats for the report.
- Complete the fields described in the table below.
| Field | Description |
|---|---|
| Amount Format | Select the display unit for amounts in the dropdown list. |
| Show Decimal | Select this option if you want to see the digits after comma in the amounts. |
| For command line only | Select this checkbox to launch a report through the command line only. |
| Engine | In this dropdown list, select the software to use for report creation. |
| Format | In this dropdown list, select the format of the output file. |
| Save to file | Click the button, then, in the contextual window, select the name and location of the output file. |
| Send | Click the button, then, in the contextual window, select the recipients of the e-mail including the report. The address book is the default one associated with your messaging account. |
| Select a printer for the printing of the report. |
- Enable the Show Total Only option, if you do not want to include the transactions' details, but if you want to include the line of the transactions total amounts only.
- Click the Period tab.
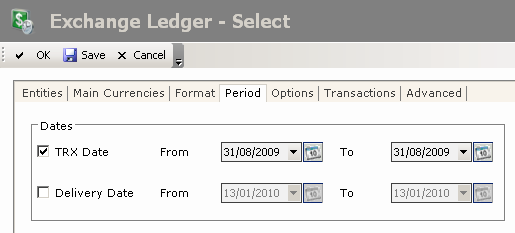
This tab enables you to specify filtering criteria on the transaction and delivery dates of the FX transactions to include in the report.
- To define a filtering process on the transaction date:
- Enable the option TRX Date.
The fields next to the option are enabled.
- In these fields, specify the start and end date of the period, between which must fall the transaction date of the transactions to include in the report, by going through the following process:
- In the entry field, select the value to modify and enter a date with the format dd.mm.yyyy.
- or -
- Click the
 button to display the calendar.
A contextual window displays the calendar.
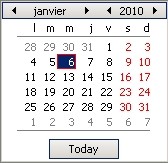
Use the arrows  and
and  to select the month, year and day.
- or -
To set the start date to today's date, click the button Today.
- To specify a filtering process on the delivery date, enable the Delivery Date option, then go through the same process as above, to define the start and end dates of the period, between which must fall the delivery date for the transactions to include in the report.
- Click the Options tab.
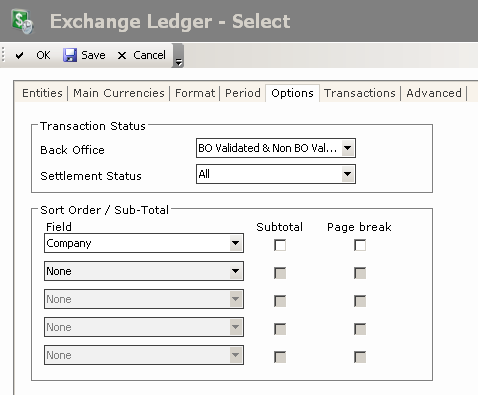
This tab enables you to specify filtering criteria on the back-office validation and settlement statuses of the transactions.
It also enables you to define different settings for the report layout:
- the order of transactions according to sorting criteria for columns,
- one subtotal for each sort criterion value,
- insertion of a page break between each sort criterion value.
For instance, you can decide to sort the columns according to the back-office validation status and to display a subtotal of transactions for each status, and you can insert a page break for each status value.
- In the Back office dropdown list of the Transaction Status area, select a filtering criterion on the back-office validation of transactions:
- Non B.O. Validated to select the non-BO-validated transactions only,
- B.O. Validated to select the BO-validated transactions only,
- B.O. Validated and Non B.O. Validated to disable any filtering process on the back-office validation.
- In the Settlement Status dropdown list, select a filtering criterion for Settlement Status of Transactions:
- All to cancel any filtering at the level of the settlement status for transactions,
- Opened to select the opened transactions only,
- Settled to select the settled transactions only.
- In the Sort Order / Subtotal area:
- Select your first column in the Field dropdown list.
- On the same line, enable the Subtotal option, if you want to display a subtotal of transactions for each selected criterion.
- Enable the Page Break option, if you want to insert a page break after each selected criterion.
- If you want to add other sort criteria, go through the same process as above, for the next lines.
Important
Select your sort criteria in the required order, as the report will follow this order.
- Click the Transactions tab.
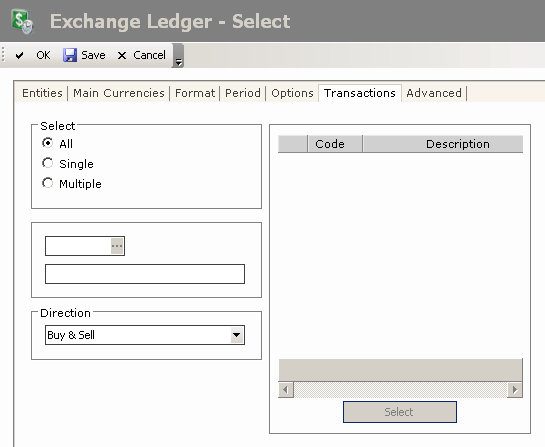
This tab enables you to specify filtering criteria on the type of the FX transactions to include in the report.
- In the Select area, enable the following option:
- All not to apply any filtering on the transaction types,
- Single to include only the FX transactions with the selected type (in the area below),
- Multiple to include the FX transactions with one of the selected types (in the area on the right).
- Go through the same process as in the Entities tab, to select one or several transaction types.
- In the Direction dropdown list, select a filtering criterion for the direction of the transaction:
- Buy to select the buy transactions only,
- Sell to select the sell transactions only,
- Buy & Sell to disable any filtering process on the transaction direction.
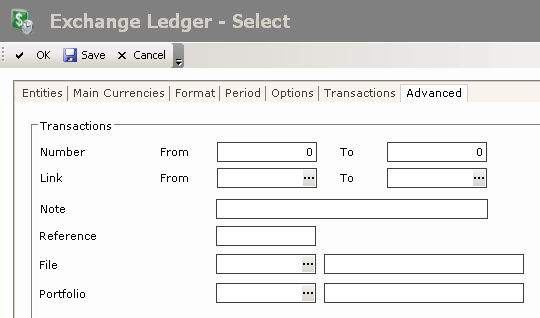
This tab enables you to specify filtering criteria on the different characteristics of FX Transactions, such as the order number, the external reference, the link number or the portfolio number.
- In the Number field of the Transactions area, enter a range of order numbers for transactions.
Important
They are not the complete numbers of transactions, but the numbers of the creation order, they can be found on the right of transactions numbers. The transaction number consists of the company code, the transaction type code and the transaction order number.
- In the Link field, enter a range of link numbers for transactions, or select a range using the button as explained previously.
- In the Notes field, enter the begining of the notes for transactions.
- In the Reference field, enter the external reference number for transactions.
- In the Portfolio field, enter the portfolio number of transactions, or select the portfolio using the button.
- Click the following buttons, as needed:
- OK to save the selected setup,
- Cancel to display again the Exchange Transactions Ledger report without saving the setup.
The creation page for filters is redisplayed.
- Click OK to confirm the filter creation and view the report with the new filter settings.